
How to Fine Tune an LLM: A Practical Guide for Beginners
Fine-tuning an LLM isn't just a technical tweak; it's about transforming a general-purpose AI into a specialist that speaks your language. Think of it this way: by training the model on your own data, you're giving it a crash course in what matters to you. It learns your specific terminology, your brand's voice, and the common problems your customers face. This makes it a much more powerful and relevant tool than any generic, off-the-shelf solution.
Why Fine-Tuning an LLM Is a Game Changer

Ever feel like a powerful AI like ChatGPT just doesn't quite get your business? It's a common frustration for a lot of folks. These models are amazing, but they're trained on the vast, generic internet. They don't know your company's internal jargon, the specific flavor of your marketing copy, or the recurring issues your customers run into.
This is where the magic of fine-tuning comes in. Instead of just giving instructions to a generalist AI, you're essentially creating a specialist that's tailor-made for your needs. It’s like promoting a brilliant intern who knows nothing about your company to an expert employee who knows all the ins and outs.
From General Knowledge to Expert Skill
The whole idea is to build upon the massive foundation of knowledge a pre-trained model already has. The most common way to do this is with Supervised Fine-Tuning (SFT). You take your own labeled, human-verified data—think of it as a cheat sheet with perfect question-and-answer pairs or instruction-and-response examples—and use it to adapt the model.
This is way more efficient than training a model from scratch. In fact, it can often halve the compute time and cost while honing the model for niche tasks, like analyzing legal documents or generating medical reports. You can find some great insights into this technique over at Superannotate.
This process unlocks some incredible, real-world advantages. Imagine a customer service bot that doesn't just recite a script but provides genuinely helpful, empathetic answers because it's learned from thousands of your past support tickets. Or picture an AI that drafts marketing copy that actually sounds like your brand, not a generic robot.
"Most people start with complex prompt engineering, trying to force a general model to act like a specialist. Fine-tuning flips that on its head. You create a specialist from the start, which makes every interaction simpler and more accurate." – AI Development Expert
What You Gain with a Custom Model
Fine-tuning isn't just a technical exercise; it’s a strategic move with tangible business benefits. By investing a little time here, you can achieve results that just aren't possible with prompt engineering alone.
- Unmatched Accuracy: The model learns the nuances of your specific domain, leading to far fewer mistakes and more on-point outputs.
- Consistent Brand Voice: You can train an LLM to adopt your specific tone, style, and vocabulary, ensuring all generated content is perfectly on-brand.
- Increased Efficiency: A fine-tuned model needs less hand-holding. Your prompts can be shorter and simpler because the model already has the necessary context baked in.
- Deeper Personalization: You can create truly tailored experiences for users by building models that understand their specific needs and history.
The growing impact and scale with chatgpt demonstrates what’s possible with a generalist tool. Fine-tuning takes that raw potential and focuses it, creating something that is uniquely yours. Let's skip the dense theory and jump into a hands-on guide, starting with why this is one of the most powerful moves you can make in AI today.
Building Your High-Quality Training Dataset
The success of your fine-tuned LLM doesn't hinge on some arcane algorithm or a beast of a computer; it's all about the quality of your training data. The old saying "garbage in, garbage out" is the absolute golden rule here. Your model will only be as smart, accurate, and on-brand as the examples you feed it.
But don't get intimidated! You don't need a Ph.D. in data science to nail this. The core idea is surprisingly simple: create a set of examples that show the model exactly what a perfect answer looks like for your specific task. Honestly, this is the most critical part of the entire fine-tuning journey.
This infographic breaks down what you should be focusing on.
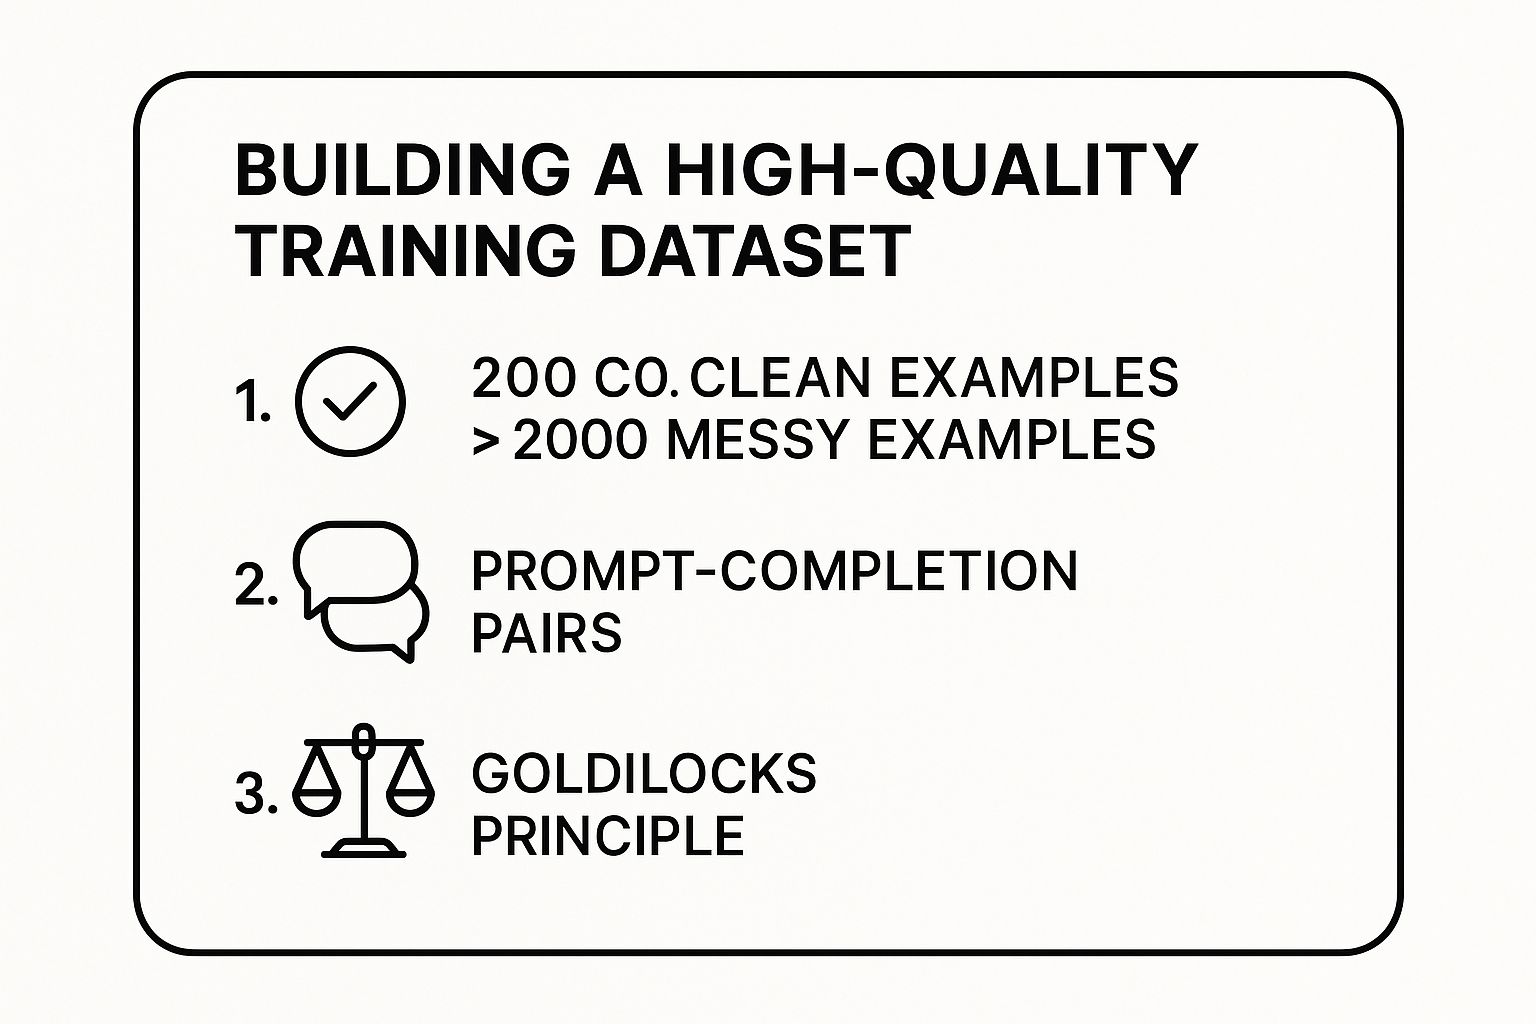
As you can see, it all boils down to quality, proper formatting, and finding the right quantity. Trust me on this: a small, pristine dataset will always outperform a massive, messy one.
Structuring Your Data as Prompt-Completion Pairs
To teach the model, you need to format your data in a simple, conversational way it can understand. This is where prompt-completion pairs come in (sometimes you'll see them called instruction-response pairs). Think of it as creating a script for the model to follow.
- Prompt: This is the input you'd give the model. For example, a customer's question.
- Completion: This is the ideal, perfect output you want the model to generate in response. For example, the perfect support answer.
Let's make this real. Imagine you want a customer support bot to handle questions about your return policy. A great place to start would be to pull your top 20 most common support tickets and their ideal resolutions right from your help desk software.
Each one of those ticket-and-answer combos becomes a single training example. Here’s what one might look like in the required format:
{
  "messages": [
    {
      "role": "user",
      "content": "Hi, I ordered a product last week but it arrived damaged. What's your policy for returns on broken items?"
    },
    {
      "role": "assistant",
      "content": "I'm so sorry to hear your item arrived damaged! We can definitely help with that. You can request a free replacement or a full refund within 30 days of delivery. Just head to your order history and select 'Return Item' to get started."
    }
  ]
}
By putting together a few hundred of these high-quality examples, you're explicitly showing the model how to handle a specific task in your brand's unique voice. It’s like building the perfect playbook for it to study.
"Beginners often think they need massive datasets. In reality, a focused dataset of just 200 clean examples that perfectly capture the desired behavior is far more powerful than 2,000 messy, inconsistent ones. Quality is the only metric that matters." – AI Development Expert
Following the Goldilocks Principle
So, how much data do you really need? This is where I like to apply the "Goldilocks principle"—you're looking for an amount that's just right.
If you use too little data, the model won't pick up on the pattern. But if you throw too much messy data at it, it will get confused and learn the wrong things.
For many specific tasks, you can get incredible results with a surprisingly small number of examples.
- Style and Tone Adaptation: Want the model to write in your brand's voice? You might only need 50-100 examples from your best marketing copy.
- Simple Task Automation: For something like summarizing meeting notes into a standard template, 100-200 examples are often more than enough.
- Complex Q&A: If you're building a bot to answer detailed questions from your internal knowledge base, you’ll want to start with at least 500+ examples.
The key is to start small, meticulously clean your data, and test the results. Your goal isn't to dump a library of information on the model. It's to create a concise, high-quality training manual that gives it the specialized skills it needs to shine.
Choosing the Right Model and Fine-Tuning Method
With your high-quality dataset ready to go, the next big decision is picking your tools. This means selecting a base model to build on and choosing how you're going to fine-tune it. This might sound intimidating, but it really boils down to two main paths that balance raw power with everyday practicality.
Getting this right from the start is crucial. Your choice here directly impacts your project's cost, speed, and how much computing power you’ll need. A smart decision now will save you a ton of headaches later on.
Full Fine-Tuning vs. Parameter-Efficient Fine-Tuning (PEFT)
The first choice you'll make is about the training strategy itself. The traditional method is Full Fine-Tuning, which involves updating every single parameter in the model. Think of it like sending an expert back to college for a full four-year degree in a new subject. It's incredibly thorough and can lead to amazing results, but it's also brutally slow, expensive, and demands serious hardware.
Because of its heavy resource requirements, full fine-tuning has become much less common, especially for individuals and smaller teams. Luckily, we now have a much more accessible alternative.
The modern, and frankly more practical, approach is Parameter-Efficient Fine-Tuning (PEFT). Instead of overhauling the entire model, PEFT methods surgically update only a tiny fraction of its parameters. It’s like giving that same expert a specialized cheat sheet for a new task—it’s faster, way cheaper, and often just as effective. In fact, it's projected that over 75% of enterprises will integrate LLMs into their strategies by 2025, and PEFT is a key reason this is even possible.
The most popular PEFT technique by far is LoRA (Low-Rank Adaptation). LoRA is a game-changer because it slashes the memory and compute power needed, making it possible to fine-tune massive models on a single, consumer-grade GPU. This efficiency is what makes learning how to fine tune an LLM a realistic goal for almost anyone.
Expert Opinion: "PEFT, and especially LoRA, has democratized fine-tuning. What used to require a dedicated server and a hefty budget can now be done on a cloud VM for a few dollars. For 95% of use cases, it delivers comparable performance to full fine-tuning with a fraction of the resources."
Selecting Your Base Model
Once you've settled on a method (and for beginners, PEFT is almost always the right answer), you need to pick your foundation: the base model. This is the pre-trained LLM you’ll be customizing. The open-source community has given us some incredible options to work with.
Here are a few of the most popular and reliable choices out there:
- Llama 3: Developed by Meta, the Llama 3 models are fantastic all-rounders. They’re known for their strong reasoning and instruction-following abilities, making them a solid default choice for a wide range of tasks.
- Mistral: The models from Mistral AI are famous for their efficiency and top-tier performance, particularly in creative and conversational contexts. They often punch well above their weight, delivering results comparable to much larger models.
- Gemma: Google's family of open models, Gemma, are also excellent. They are designed to be lightweight and run well on more modest hardware, which is perfect when you're just starting out or experimenting.
So, how do you actually choose one? It really comes down to what you're trying to accomplish. If your goal is analytical—like summarizing legal documents—Llama 3's reasoning skills might give you an edge. If you're building a creative writing assistant, Mistral’s natural conversational flow could be a better fit. A great practice is to simply test them. Run a small fine-tuning job with two different base models and see which one performs better on your specific data.
For those looking to explore more advanced agent-based approaches, you can learn more about Reinforcement Finetuning (RFT) for agents in our detailed guide.
Full Fine-Tuning vs. PEFT (LoRA)
To make the choice even clearer, here’s a side-by-side comparison to help you choose the right fine-tuning method based on your resources and goals.
| Aspect | Full Fine-Tuning | Parameter-Efficient Fine-Tuning (PEFT) | Best For |
|---|---|---|---|
| Parameters Updated | Updates all model weights (billions of them) | Updates a small fraction of weights (thousands to millions) | PEFT is best for almost all modern use cases, especially for beginners. |
| Resource Needs | Very high (multiple high-end GPUs, lots of RAM) | Low (can run on a single consumer GPU or even a CPU) | Projects with limited budgets or hardware constraints. |
| Training Time | Slow (can take hours or days) | Fast (often completes in minutes to a few hours) | Rapid prototyping and iterative development. |
| Risk of Forgetting | Higher risk of "catastrophic forgetting" where the model loses general knowledge | Lower risk, as the original model weights are frozen | Maintaining the model's broad, pre-trained knowledge base. |
Ultimately, by choosing a PEFT method like LoRA and starting with a powerful open-source model like Llama 3 or Mistral, you put yourself in a great position to succeed without needing a massive budget. This combination is what empowers you to create a specialized AI that’s perfectly suited to your unique needs.
A Hands-On Walkthrough of the Fine-Tuning Process

Alright, you've got a solid dataset and picked a model—now for the fun part. This is where we stop talking about theory and actually start building our custom AI. We’re going to kick off the training job and watch the model learn right before our eyes.
And don't worry, you won't need a supercomputer. We'll be using accessible tools like Google Colab, which gives you free access to the GPUs needed to make this happen. I'll give you some simple code snippets and break down what each line does, steering clear of the heavy technical jargon.
Setting Up Your Environment
Before we can train anything, we need to get our workspace ready. I'm a big fan of Google Colab for projects like this, especially if you're just starting out. It's basically a ready-to-go Python environment with GPU support built right in, which dramatically speeds up the whole process.
First thing’s first: installing the necessary libraries. For most LLM work, the Hugging Face ecosystem is your best friend. It has all the tools we need to download models, wrangle data, and run the training itself.
Just pop this command into a new Colab notebook cell:
!pip install transformers datasets accelerate peft bitsandbytes trl
That one line handles a lot. It grabs transformers for the models, datasets for data handling, accelerate to make sure the training runs smoothly on your hardware, and peft for the efficient fine-tuning method we're using. Once that's done, your environment is ready to roll.
Configuring Key Training Parameters
Now we need to give our trainer some instructions. These are called hyperparameters, and they're just settings that guide the learning process. Getting these right is a bit of an art form, but a few key parameters will get you 90% of the way there.
Think of it like setting up a study plan for a student. You have to decide how long each study session is, how many sessions they get, and how quickly they should absorb new information.
-
Learning Rate: This is arguably the most critical setting. It controls how big of a "step" the model takes when updating its knowledge based on your data. Too high, and it might leap right over the correct answers. Too low, and it will learn so slowly you'll be waiting forever. A good starting point is usually a small number, like 2e-4.
-
Epochs: An epoch is one complete pass through your entire training dataset. If you have 500 examples and set the epochs to 3, the model will see every single example three times. This repetition is what helps it really lock in the patterns you want it to learn.
-
Batch Size: This tells the model how many training examples to look at in a single go before it updates itself. A smaller batch size (like 1 or 2) uses less memory, which is great for Colab, but can make the learning process a little less stable.
"I see beginners over-train their models all the time. They assume more epochs always lead to a better result, but that's a quick way to get an overfit model that just memorized the training data. Seriously, start with just three epochs and see what you get. You’ll be surprised how often that’s all you need." – AI Development Expert
You'll define these settings in a configuration object in your code, which keeps everything neat and easy to adjust later.
Launching and Monitoring the Job
With your configuration locked in, kicking off the training is often as simple as one line of code: trainer.train().
Once you run that, you’ll see the process fire up. A progress bar will appear, but what you really want to watch is a number called "training loss." This is your window into the model’s brain while it's learning.
-
What is Training Loss? Simply put, loss is a score that shows how "wrong" the model's predictions are compared to the actual answers in your dataset. A high loss means it's way off; a low loss means it's getting things right.
-
What Should You See? As the training chugs along, you want to see that loss number steadily go down. That’s the classic sign that the model is learning from your data. If the loss plateaus or, even worse, starts going up, that’s a red flag that something is off with your data or parameters.
For a small dataset on Colab, a typical run might take anywhere from 15 minutes to a couple of hours. When it’s done, the training script will save your new model adapters. These are the small, lightweight files that hold all the specialized knowledge your model just learned.
And just like that, you've done it. You have a fine-tuned model, ready to be put to work.
How to Evaluate Your Model and Avoid Common Pitfalls

So, your training job is finally finished. That "training complete" message is a great feeling, but the real work starts now. The million-dollar question is: did it actually work? Is your new, specialized model any good?
This is where evaluation comes in, and frankly, it's just as crucial as the training itself. Firing off a few test questions to your model and calling it a day just won't cut it. To get a real sense of its capabilities, you need a smart, systematic way to test its performance on problems it has never seen before.
Creating Your Golden Validation Set
The best way to judge your model's real-world performance is with a validation set. Think of this as a collection of prompt-and-completion pairs, structured just like your training data, but with one critical difference: the model has never been trained on them. This is your final exam—a fair and unbiased test of its new skills.
To put it another way, your training data was the textbook the model studied. Your validation set is the surprise quiz that proves it actually learned the concepts, not just memorized the pages.
For this to be effective, your validation set needs a few key characteristics:
- It must be representative. The prompts should cover the same kinds of questions and tasks you expect the model to handle in production.
- It needs to be high-quality. Just like your training data, the prompts should be crystal clear, and the "correct" completions should be perfect examples of what you want.
- It has to be held out. This is non-negotiable. You must never include these examples in the data you use for the actual training process.
A good rule of thumb is to set aside 10-20% of your initial, high-quality dataset to serve as this validation set. Running your newly-tuned model against these unseen prompts will give you a true measure of how well it can generalize what it's learned.
Avoiding the Pitfall of Overfitting
One of the most common traps I see teams fall into is overfitting. This is what happens when your model gets too good at the training data. Instead of learning the underlying patterns and logic, it essentially just memorizes the specific examples you fed it.
It’s like a student who crams for a test by memorizing the exact answers to the practice questions. They might ace the practice test, but they'll completely fall apart the moment they see a new question that tests the actual concept. An overfit model looks fantastic on paper (you'll see a very low training loss), but it fails miserably in any practical application.
This problem often stems from a training dataset that's too small or from training the model for too many epochs. The model eventually runs out of new patterns to learn and starts memorizing instead.
"Overfitting is the silent killer of many fine-tuning projects. The model's performance on the training data looks amazing, but it can't answer a slightly different question to save its life. This is why a separate validation set is non-negotiable—it's your reality check." – AI Development Expert
Dodging Catastrophic Forgetting
Another beast you have to watch out for, especially with full fine-tuning, is catastrophic forgetting. This happens when the model becomes so specialized in its new task that it forgets a huge chunk of the broad, general knowledge it started with. It masters the new skill but at the cost of its original intelligence.
For instance, you might fine-tune a model to become an expert at writing SQL queries. But in the process, it might suddenly become terrible at creative writing or summarizing articles—tasks it could handle perfectly before you touched it.
Full fine-tuning of large models, which adjusts all of the model’s parameters, comes with both benefits and challenges. As you discover more insights about these fine-tuning risks on Heavybit, you'll see why many are now opting for more efficient methods that mitigate issues like overfitting and catastrophic forgetting.
Strategies for Success
Spotting these issues is half the battle. If your validation tests show poor performance, don't get discouraged! This is a completely normal part of the process. The next step is simply to go back and iterate.
You might need to add more diversity to your training data, pull back on the number of epochs, or adjust your learning rate. The goal is to find that sweet spot where the model learns your specific task without memorizing the data or forgetting its foundational knowledge.
As you build, always keep ethical AI practices in mind and be aware of how these powerful tools could be misused. Our article on disrupting malicious uses of AI provides some important context on this front. By carefully evaluating and iterating, you can turn a good first attempt into a great, reliable AI tool.
Got Questions About Fine-Tuning?
As you start working with custom AI, you’re going to have questions. This space is constantly shifting, and the jargon can be a lot to take in. To help you out, I’ve put together answers to some of the most common questions people ask when they're first learning to fine-tune an LLM.
How Much Data Do I Really Need to Fine-Tune an LLM?
This is the big one, and the honest answer is: it depends. But here’s the key takeaway—quality always trumps quantity. There's no magic number that works for every single project. For some simpler tasks, a few hundred really good examples can get the job done surprisingly well.
Here’s a rough guide based on what I’ve seen work in practice:
- To nail a specific style or tone, you might only need 50-100 killer examples.
- For simple classification or basic task automation, 200-500 clean, well-structured examples is a solid starting point.
- If you're trying to teach the model genuinely new, complex knowledge, you're likely looking at 1,000+ examples to get truly strong performance.
My advice? Start small. Put together a small, squeaky-clean dataset first. You can always add more data later if your evaluation metrics tell you the model is still struggling. Seriously, 100 perfect examples will give you better results than 10,000 messy ones every time.
What Is the Difference Between Fine-Tuning and Prompt Engineering?
I like to use an analogy for this. Think of prompt engineering as giving a brilliant, all-purpose assistant a super detailed, step-by-step to-do list for a specific task. You're cleverly working with the model's existing, general knowledge.
Fine-tuning, on the other hand, is like sending that same assistant to a specialized training academy. They come back a true expert in one specific domain. You’re fundamentally changing the model's internal weights and biases, making it an expert at your task so you don't need those crazy-detailed instructions anymore.
"An expert prompt engineer can make a general model act like a specialist. A fine-tuned model is a specialist, which makes every interaction with it simpler and more reliable down the line." – AI Development Expert
Can I Fine-Tune a Model Like GPT-4?
Yes, you can, but the process is quite different from what we’ve been talking about in this guide. Big, closed-source models like OpenAI's GPT series can be fine-tuned through their APIs. This approach is often more straightforward for beginners, but it comes with some important trade-offs:
- Less Control: You're working in a black box. You can't get under the hood to tweak the model's architecture or mess with the training process itself.
- Higher Cost: API-based fine-tuning can get expensive, especially over time, since you're paying for the training compute and every call you make to your custom model afterward.
This guide focuses on fine-tuning open-source models like Llama 3 or models from Mistral AI. When you go this route, you have total freedom. You can download the model, run the training on your own machine (or a cloud instance), and you own the final, fine-tuned model outright.
How Much Does It Cost to Fine-Tune an LLM?
The cost can swing wildly from absolutely free to thousands of dollars. It all comes down to the path you take.
If you’re using a slick API from a provider like OpenAI, a small fine-tuning job might only set you back a few dollars. If you decide to roll up your sleeves and run the training yourself on a cloud service like AWS or Google Cloud, your cost is directly tied to how much GPU time you use. A quick experiment with PEFT could be just a few bucks, while a full fine-tune of a massive model could easily run into the hundreds or even thousands.
But here’s the good news: thanks to efficient methods like LoRA and free tools like Google Colab, you can get your feet wet and see fantastic results for little to no money. Fine-tuning has never been more accessible.
At YourAI2Day, we believe that understanding and applying AI should be accessible to everyone. We provide the latest news, practical guides, and expert insights to help you stay ahead. Explore more resources and join our community at https://www.yourai2day.com.